CLICK TO HOSTING A WEBPAGE

Web hosting

Thursday, June 23, 2016

Virus Detection and Prevention Tips

1. Do not open any files attached to an email from an unknown, suspicious or untrustworthy source.

2. Do not open any files attached to an email unless you know what it is, even if it appears to come from a dear friend or someone you know. Some viruses can replicate themselves and spread through email. Better be safe than sorry and confirm that they really sent it.

3. Do not open any files attached to an email if the subject line is questionable or unexpected. If the need to do so is there always save the file to your hard drive before doing so.

4. Delete chain emails and junk email. Do not forward or reply to any to them. These types of email are considered spam, which is unsolicited, intrusive mail that clogs up the network.

5. Do not download any files from strangers.

6. Exercise caution when downloading files from the Internet. Ensure that the source is a legitimate and reputable one. Verify that an anti-virus program checks the files on the download site. If you’re uncertain, don’t download the file at all or download the file to a floppy and test it with your own anti-virus software.

7. Update your anti-virus software regularly. Over 500 viruses are discovered each month, so you’ll want to be protected. These updates should be at the least the products virus signature files. You may also need to update the product’s scanning engine as well.

8. Back up your files on a regular basis. If a virus destroys your files, at least you can replace them with your back-up copy. You should store your backup copy in a separate location from your work files, one that is preferably not on your computer.

9. When in doubt, always err on the side of caution and do not open, download, or execute any files or email attachments. Not executing is the more important of these caveats. Check with your product vendors for updates which include those for your operating system web browser, and email . One example is the security site section of Microsoft located at http://www.microsoft.com/security.

What is transmission media ?

Transmission media  is a pathway that carries the information from sender to receiver. We use different types of cables or waves to transmit data. Data is transmitted normally through electrical or electromagnetic signals.


                                                      Types of Transmission Media


fig : transmission medium

Transmission media is broadly classified into two groups.
1. Wired or Guided Media or Bound Transmission Media
2. Wireless or Unguided Media or Unbound Transmission Media

Wired or Guided Media or Bound Transmission Media: Bound transmission media are the cables that are tangible or have physical existence and are limited by the physical geography. Popular bound transmission media in use are twisted pair cable, co-axial cable and fiber optical cable. Each of them has its own characteristics like transmission speed, effect of noise, physical appearance, cost etc.
Wireless or Unguided Media or Unbound Transmission Media: Unbound transmission media are the ways of transmitting data without using any cables. These media are not bounded by physical geography. This type of transmission is called Wireless communication. Nowadays wireless communication is becoming popular. Wireless LANs are being installed in office and college campuses. This transmission uses Microwave, Radiowave, Infrared are some of popular unbound transmission media.

Note: - Bandwidth. It refers to the data carrying capacity of a channel or medium. Higher bandwidth communication channels support higher data rates.

Wednesday, June 22, 2016

HOW TO REPAIR A PRINTER SOFTWARE PROBLEM WITH HARDWARE ?


Symptom
The Printer is not printing
Diagnosis
  • Check to see if the printer getting power
  • If there are no lights or no display on the front of the printer, the printer is not getting electricity or power. Check to make sure the power cord is plugged in both to the wall or power strip and to the back of the printer. Wiggle the power cord where it plugs into the back of the printer to make sure it is not loose. Some models of desk jets have a two part power cord. In this case, check along the length of the power cord to make sure both parts are plugged in together.
  • If the printer is still not getting power, plug the power cord into a different outlet on the power strip. If this does not work, try plugging the printer into a different wall outlet.
Check to see if you can print a Windows test page
The windows test page is a basic communication test between your computer and the printer. To print a Windows test page:
  • Left mouse-click on the Start button.
  • Go to Settings and then select Printers. Inside the printer window, you should see a small printer icon with the name of printer you are trying to print to.
  • Place your mouse arrow on the small printer icon and right mouse-click. A small gray window should appear and the last choice in the box is Properties.
  • Left mouse-click on Properties. A printer window with several tabs should appear.
  • On the General tab, there is a Print Test Page button in the lower right corner. Left mouse-click on the button. You may click on the "Yes" button on your screen, but the real question is: Did anything print from the printer?
  • If the answer is no, please call or e-mail the Help Desk at x1112.
  • If you can print a Windows test page, try to print from a different program. If the document does not print from that program, the printing problem has to do with that program.
Check to see if there is paper in printer. Is their a paper jam?
  • If the printer has paper in the paper tray, the paper may be jammed or not feeding properly. Take the paper out of the paper tray and check to see that the top piece of paper is not crinkled or bent.
  • If the printer is a DeskJet, lift open the front cover and look to see if a piece of paper is halfway fed through. If it is, remove paper gently from the top and close.
  • If the printer is a LaserJet, open the top of the printer and check for paper underneath the toner cartridge. If there is paper there, gently remove it, and replace the toner cartridge.
Check to see if the computer getting a signal from the printer.
  • The computer and the printer must be communicating before the printer will print. When you send a document to print, does a small printer appear on the Windows taskbar (down by the time)? If this printer appears on the taskbar, the computer thinks the printer is receiving communication. At this point, the printer should blink lights (if a DeskJet) or says "printing" or "receiving" on the display (if a laser printer). If the printer is not receiving the communication from the computer, try restarting the computer. After you have logged in, see if you can print now.
Check to see if Printer offline or Paused.
  • If the printer is off-line or paused, the print jobs will just stack up in the print queue but nothing prints.
  • Left mouse-click on the Start button
  • Go to Settings
  • Then choose Printers
  • The Printer folder should open and display the printers installed on this PC.
  • Place your mouse arrow on the printer you are checking and right mouse click. A dialog box should open.
  • If the printer is paused or offline you will see a black check mark next to the words "Pause Printing" or "Printer Offline."
  • Left mouse-click on the black check mark and see if you can "uncheck" it.
  • If the check mark will not go away, try restarting the PC (Start – Shutdown – Restart).
  • Then repeat steps 1 through 7 again.
  • If the printer is still not printing, please contact the Help Desk at x1112
Check to see if there multiple jobs in the Print queue.
  • If the printer is a local printer (i.e., there is a cable running directly from the printer to the computer you are printing from), power off the PC, power off the printer, count to 10, and then turn both the printer and the computer back on again. Sometimes this will allow the printer to start printing again.
Symptom
The printer is printing streaks on the page
Diagnosis
  • If the printer is a DeskJet, go to the HP DeskJet Utilities menu in the Program menu. Choose the "Clean the Print Cartridges" option. If this does not work, try replacing the ink cartridge. If the new cartridge does not help the streaking, place the cartridge back inside the original packaging and save it until the other cartridge has been used up. This just tests to see if the ink cartridge is defective.
  • If the printer is a LaserJet, try changing the toner cartridge. If the new toner cartridge does not improve the streaking problem, return old cartridge to the printer and place the new toner cartridge back in its original packaging for later use.
  • If neither option works, please visit the printer maintenance vendor list to schedule printer service.
The printer in spite of everything is not printing?
  • Turn the PC off. If the printer is a local printer, i.e., has a direct cable hookup to the PC, turn the printer off also so both the PC and printer are turned off at the same time. After 30 seconds, turn the PC and the printer back on again. Try to print a Windows test page. If the printer still does not print, please contact the Help Desk x1112.

HOW TO MAKE YOUR COMPUTER FAST


WITH THIS TUTORIAL YOU CAN MAKE YOUR PC OR COMPUTER FAST THEN BEFORE
Symptom
The cursor is stuck on the hourglass
Diagnosis
Open Task Manager
  • Simultaneously press [Ctrl] [Alt] [Delete]. You will see a list of all tasks (programs) currently running. You may notice one program has "Not Responding" instead of "Running" listed next to it. Select this task and click the End Task button.
  • Another dialog box will open stating that the program is not responding. Choose End Now to close the program.
Reboot your computer (Warm Boot)
Resetting a computer that is already turned on:
  • Press [Ctrl] [Alt] [Delete] once to open the Task Manager.
  • Press [Ctrl] [Alt] [Delete] again to restart the computer.
Shut down your computer (Cold Boot)
  • Start-up of a computer from a powered-down state.
    If you restart your computer and the problem isn’t resolved, make an attempt to completely shut down the computer by pressing the power button. Let it set for 15-30 seconds then restart the computer.
Symptom
You have run out of disk space on your computer. Music files, movies, digital pictures, and other big data files can fill up your hard drive.
Diagnosis
To check for disk space:
  • Open My Computer. Right click on the C: drive and select Properties from the shortcut menu. A pie chart will appear telling you the used and free space.
  • Try running the Disk Cleanup Wizard. This utility can tell you whether you are running out of room and help you clear away some space. Click the Start button and choose Programs | Accessories | System Tools | Disk Cleanup. Choose the disk to clean up (C: ) and let the wizard do the work.

Wednesday, June 15, 2016

Sharing & printer sharing Using wireless and wire.

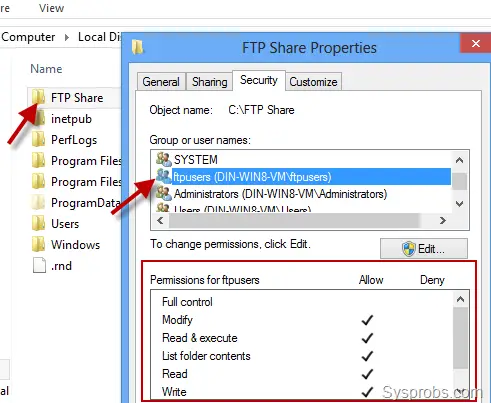
Sharing and printer sharing is mostly useful in the organization. Sharing is done to share your data from one PC to another PC. Sharing can be done using both wire and wireless medium. Its simple to share using wire medium connect your computer to another computer or use switch to connect more than two computer where as wireless doesn’t need switch to connect. A wire which has to be connected in pc you have created it above at the section of “How to wire your own Ethernet cables and connectors.”
Now  to sharing your data without help of internet you should connect your computer in same network (Same network means IP should connected in same network id.) 
E.g.:- 192.168.1.11 and 192.168.1.12 this is two different IP address with same network id. The yellow highlight is the network id portion which denotes that we are on in same network.

To input your own IP addresses follow this below steps:-
 Go to control panel
 Network sharing centre
 Select your connected network for e.g. :- Ethernet,wifi etc
 Go to properties 
 Select IPv4
 And click on  properties
 Select use your own IP address and input as usual IP address you want with same network ID.
For all of sharing you have to do this above process.
And finally turn off your windows firewall.
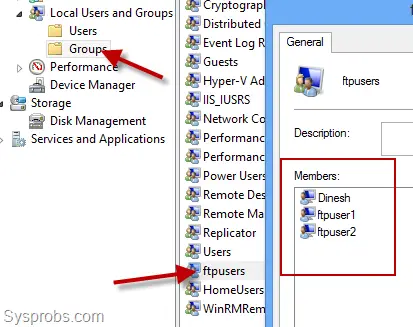
You have to create workgroup  or home group
31  
Open the System icon in the Control Panel.
Or choose Start

Control Panel
→ System. The System Properties dialog box appears.
32  
Click the Change Settings link located in the Computer Name, Domain and Workgroup Settings area.
Click the Continue button if you’re prompted with a User Account Control security warning.
33  
      
Click the Change button.
The Computer Name/Domain Changes dialog box appears. 
34  
In the Member Of area, select the option labeled Workgroup and type the name of the workgroup.
Either enter the name of an existing workgroup or create a new name for your workgroup here. The workgroup name should be short, with no spaces.  
Click OK three times to close windows.
You want to close the Computer Name Changes dialog box, the welcome message, and the restart message 
      
Click the Close button to dismiss the System Properties dialog box.
You can also close the Control Panel window, if you want
35  
Restart Windows.
To view all computers belonging to the workgroup, open the Network window.
Now turn on and of this feature 
This article explains how to set up file and printer sharing on a home network with computers running different versions of Windows.
If all computers on your home network are running Windows 7, create a homegroup
By far, the easiest way to set up file and printer sharing on a home network is to create a homegroup. A homegroup links computers on your network so that you can share pictures, music, videos, documents, and printers. You can help protect a homegroup with a password, and you'll always be able to choose what you share with the group. If all of the computers that you want to network are running Windows 7, creating a homegroup is the recommended method.
HomeGroup is available in all editions of Windows 7. In Windows 7 Starter and Windows 7 Home Basic, you can join a homegroup, but you can’t create one.
After you create a homegroup, you're done, and you can skip the rest of this article. If you aren’t ready to upgrade all of your computers to Windows 7, you can still get your network running smoothly. Read the following sections to learn how to address the differences between the versions of Windows
Top of page
36 
If your network contains computers running different versions of Windows, put all computers in the same workgroup
Let's assume that you've already set up the physical network itself. If you haven’t, see What you need to set up a home network.
After your network is set up, the next step is to fine-tune it so that all the computers can find each other— something you'll need if you want to share files and printers.
If computers running Windows XP are part of your network, it’s important to use the same workgroup name for all of the computers on your network. This makes it possible for computers running different versions of Windows to detect and access each other. Remember that the default workgroup name is not the same in all versions of Windows.
To find or change the workgroup name on a computer running Windows XP
1. Click Start, right-click My Computer, and then click Properties.
2. In System Properties, click the Computer Name tab to see the workgroup name. To change the name, click Change, type the new name in Computer name, and then click OK.
To find the workgroup name on a computer running Windows Vista or Windows 7
1. Open System by clicking the Start button , right-clicking Computer, and then clicking Properties.
2. The workgroup name is displayed under Computer name, domain, and workgroup settings.
To change the workgroup name on a computer running Windows Vista or Windows 7
1. Open System by clicking the Start button , right-clicking Computer, and then clicking Properties.
2. Under Computer name, domain, and workgroup settings, click Change settings.
3. In System Properties, on the Computer Name tab, click Change.
4. In Computer Name/Domain Changes, in Workgroup, type the name of the workgroup you want to use, and then clickOK. You will be prompted to restart your computer.
The workgroup name is displayed
in the System window
37  
Set the network location to Home or Work
Next, check the network location on all computers running Windows Vista or Windows 7. The network location is a setting that allows Windows to automatically adjust security and other settings based on the type of network that the computer is connected to. For more information, see choosing a network location.
There are four network locations:
• Home. The computer is connected to a network that has some level of protection from the Internet (for example, a router and a firewall) and contains known or trusted computers. Most home networks fall into this category. HomeGroup is available on networks with the Home network location.
• Work. The computer is connected to a network that has some level of protection from the Internet (for example, a router and a firewall) and contains known or trusted computers. Most small business networks fall into this category.
• Public. The computer is connected to a network that's available for public use. Examples of public network types are public Internet access networks, such as those found in airports, libraries, and coffee shops.
• Domain. The computer is connected to a network that contains an Active Directory domain controller. An example of a domain network is a network at a workplace. This network location is not available as an option and must be set by the domain administrator.
For your home network, make sure that the network location type is set to Home. Here's how to check:
• Open Network and Sharing Center by clicking the Start button , and then clicking Control Panel. In the search box, typenetwork, and then click Network and Sharing Center.
The network location type is displayed below the network name.
38 
The network location type is
displayed in Network and Sharing Center
If your network type is public, click Public network, and then select the network location you want.
Warning
• You should only change a network to Home or Work if it's a known and trusted network, such as your home or small business network. Changing a network in a public place to Home or Work can be a security risk because it allows other people on the network to see your computer.
Make sure your firewall allows file and printer sharing
If you're using Windows Firewall, you can skip this section, because Windows Firewall automatically opens the correct ports for file and printer sharing when you share something or turn on network discovery. (For more information about network discovery, see What is network discovery?) If you're using another firewall, you must open these ports yourself so that your computer can find other computers and devices that have files or printers that you want to share.
Turn on additional file and printer sharing options
By changing your network location to Home or Work, network discovery is automatically turned on . You can also turn on these sharing options individually:
• Network discovery
• File sharing (in Windows 7, this is automatically turned on when you share a file or folder)
• Public folder sharing
When you turn on these options, your computer can:
39 
• Find other computers and devices on your home network and have other computers find your computer
• Share its files and folders
• Share its Public folders
To turn on network discovery, file and printer sharing, and public folder sharing in Windows 7
1. Open Advanced sharing settings by clicking the Start button , and then clicking Control Panel. In the search box, typenetwork, click Network and Sharing Center, and then, in the left pane, click Change advanced sharing settings.
2. Click the chevron  to expand the Home or Work network profile. 3. Select the options to turn on network discovery and file sharing.
4. Under Public folder sharing, do one of the following:
• To share your Public folders so that people on other computers on the network can open files in them but can't create or change files, click Turn on sharing so anyone with network access can open files.
• To share your Public folders so that people on other computers on the network can open files in them and also create or change files, click Turn on sharing so anyone with network access can open, change, and create files.
Click Save changes.  If you're prompted for an administrator password or confirmation, type the password or provide confirmation.
To turn on network discovery, file sharing, public folder sharing, and printer sharing in Windows Vista
1. Open Network and Sharing Center in Control Panel.
2. Under Sharing and Discovery, click the chevron  next to File sharing to expand the section, click Turn on file sharing, and then click Apply.  If you're prompted for an administrator password or confirmation, type the password or provide confirmation. 3. Click the chevron  next to Public folder sharing to expand the section, and then do one of the following: • To share the Public folder so that people on other computers on the network can open files in it but can't create or change files, click Turn on sharing so anyone with network access can open files, and then click Apply.  If you're prompted for an administrator password or confirmation, type the password or provide confirmation. This is the default setting.
• To share the Public folder so that people on other computers on the network can open files in it and also create or change files, click Turn on sharing so anyone with network access can open, change, and create files, and then click Apply.  If you're prompted for an administrator password or confirmation, type the password or provide confirmation.
40 
4. Click the chevron  next to Printer sharing to expand the section, click Turn on printer sharing, and then click Apply.  If you're prompted for an administrator password or confirmation, type the password or provide confirmation. 
Note: -  Shared Folders troubleshooter
If you’re still having trouble with sharing, you can try using the Shared Folders troubleshooter to automatically find and fix some common problems.
Open the Shared Folders troubleshooter by clicking the Start button , and then clicking Control Panel. In the search box, typetroubleshooter, and then click Troubleshooting. Under Network and Internet, click Access shared files and folders on other computers    
Sharing a Printer in the Windows Workgroup Environment Introduction Printer sharing is a simple way to make a locally attached printer, or a networked printer available to users in a secure manner allowing basic control via windows permissions, and advanced control and tracking when using third party print management products such as Print Manager Plus. While printer sharing is simplified in a domain, it can be a little tedious to be aware of how to properly share a printer within a Windows Workgroup.

Thursday, March 24, 2016

How to setup ftp server in windows 8 & window 10.

You can give access to your FTP site by restricting users with user name/password or anonymous access. It depends the purpose of FTP server on your internal or external network.

Setup FTP Server on Windows 8 or Windows 8.1

1) Open Programs and Features in Control panel. Click on Turn Windows features on or off’ as shown below(1).
If IIS was not installed earlier on particular Windows 8 or 8.1 computer, you need to install other features of IIS too ( as shown by arrow marks). See the below screenshot for the actual requirements to run FTP server on Windows 8/8.1 (All features which are ticked need to be installed).
Press OK to install the selected features.
2) After installation is completed, open ‘Internet Information Services (IIS) Manager’ in ‘Administrative Tools’ – Control Panel.
Expand the sites, right click on it and ‘Add FTP Site’.
Recommended Readings:

3) Give a name for FTP site and browse the local folder which you need to give access to others through FTP server. (I already created a folder called ‘FTP Share’ on C drive before reaching this step)
4) In next screen you need to select the local computer’s IP address from drop down box. I hope you have already set up static IP for the computer.
Under SSL option, select No SSL to make the connection without SSL certificate. In production environment for professional FTP server setup, you may need to enable SSL which requires a certificate.

How to Set Up FTP Access Permission on Windows 8 or 8.1

5) In next screen you can set the permission for users to access the FTP site. Here you need to decide how others will be accessing the FTP share and who will be having Read-only or Read & Write access.
Let’s assume this scenario, you want specific users to have read and write access, so obviously they must type an user name and password for it. Other users can access the FTP site without any username or password to view the content only, it’s called anonymous users access.
You will find several ways to do this, but here is the simple way which worked for me.
Firstly, create a group on Windows 8 local computer (if you are not using active directory environment) and add the users who will be having read and write access on FTP site. In this example I have created ‘ftpusers’ group and added required users inside it.
You must give ‘Modify’ access (Windows permission) for this group to specific folder which is linked to FTP site. ‘FTP share’ is the one in this example.
Now, let’s continue the FTP site settings. In next screen to give the permission, select ‘Basic’ which will be prompting for user name and password, select Specified  roles or groups option from drop down and type the correct group name. Set Read and Write permission for the group.
Press Finish to complete the setup.
By default Basic Authentication is enabled on Windows 8 or 8.1, but you can cross check it. Open ‘FTP Authentication’ settings of the site and make sure Basic Authentication is enabled as shown below.

Now, lets set up the anonymous users access with read only permission.
Open ‘FTP Authorization Rules’ for the FTP site you created. Create an ‘Add Allow Rule’ and set the permissions as below.
Make sure that second rule also listed.
You need to enable anonymous access under FTP Authentication settings of the site.
Check the Firewall ! It should allow FTP traffic.
We are almost done and completed the all necessary steps. Now, you need to either disable the firewall or allow FTP inbound and outbound traffic on Windows 8 or 8.1 computer. I hope you can do it easily.

Now, I could use any FTP clients and connect with a user name and password with write access, or anonymous user with read only access.